
Kia Telluride: Driver adjustments / Wipers and washers
The Kia Telluride wiper and washer system is designed to remove rain, dirt, snow, and other debris from the windshield and rear window, helping maintain clear visibility in changing weather and driving conditions.
|
|
|
-
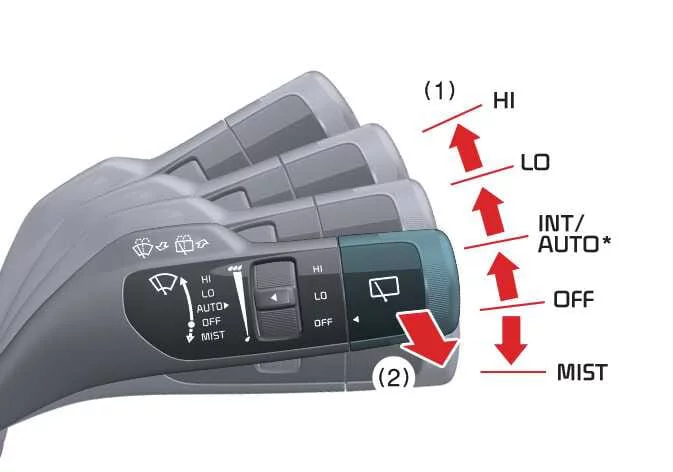
Wiper speed control
-
MIST: Single wipe
-
OFF: Wipers turned off
-
INT: Intermittent wiping
-
AUTO*: Rain sensor-controlled wiping
-
LO: Low-speed wiping
-
HI: High-speed wiping
-
-
Windshield washer with several automatic wipes (pull the lever toward you)
-
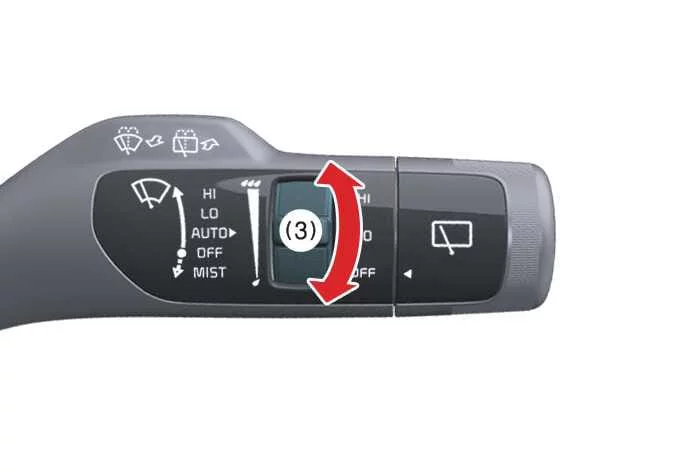
Adjustment of intermittent wiping interval and AUTO sensitivity*
-
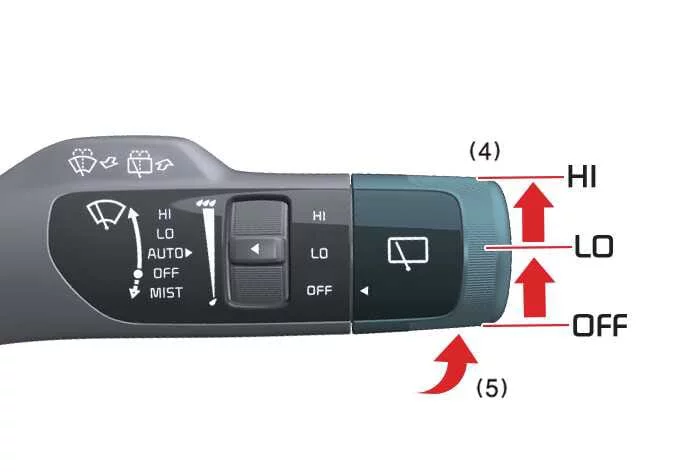
Rear wiper and washer control
-
HI: Continuous wiping
-
LO: Intermittent wiping
-
OFF: System turned off
-
-
Rear washer with several automatic wipes (push the lever away from you)
*: if equipped
Windshield wipers
With the Kia Telluride in the ON position, operate the windshield wipers using the following settings:
-
MIST: Move the lever to this position and release it for a single wiping cycle. Holding the lever in this position keeps the wipers operating continuously.
-
OFF: Turns the windshield wipers off.
-
INT: Provides intermittent wiping at preset intervals, making it suitable for light rain or mist. Rotate the interval control knob to increase or decrease the wiping frequency.
-
LO: Continuous wiping at normal speed.
-
HI: Continuous wiping at maximum speed for heavy rainfall.
WARNING
Do not activate the washer system in freezing weather until the windshield has been adequately warmed by the defroster. Washer fluid can freeze on the glass, severely reducing visibility and increasing the risk of an accident that could result in serious injury, death, or property damage.
NOTE
If snow or ice has accumulated heavily on the windshield, fully clear or defrost the glass for approximately 10 minutes before operating the wipers. Using the Kia Telluride wipers on a frozen windshield may damage both the blades and the washer system.
NOTE
-
If a communication fault occurs within the wiper system and normal operation is unavailable, move the wiper switch to the LO position. The wipers will continue operating at a constant low speed. Have the system inspected by an authorized Kia dealer as soon as possible.
-
When the switch is in the HI position, wiping speed may gradually decrease as rainfall becomes lighter and blade friction increases. Once rainfall intensifies again and resistance is reduced, normal high-speed operation will automatically return.
TIP
The infotainment system interface may change after software updates. Refer to the infotainment owner's manual and the supplied quick reference guide for the latest operating information.
TIP
If you operate the windshield wipers while driving through heavy snow, accumulated snow may temporarily stop the wipers. This is a built-in protective feature designed to prevent motor overload and damage. Remove the snow collected along the upper and lower edges of the windshield before using the wipers again.
- AUTO control: (if equipped)
- Windshield washer operation
- Rear windshield wiper and washer operation
- Camera cleaning system
 High Beam Assist (HBA)
The High Beam Assist (HBA) system on the Kia Telluride is designed to improve nighttime visibility by automatically switching between high and low beam headlights...
 AUTO control: (if equipped)
Wiper speed control switch The rain sensor, positioned near the upper portion of the windshield, continuously detects the amount of rainfall and automatically adjusts the wiping interval...
Other information:
Kia Telluride (LQ2, 2027-2026) Owner's Manual: Ergo-motion seat (Driver's seat): (if equipped)
Setting the Ergo-motion seat The Ergo-motion seat in the Kia Telluride uses adjustable air pockets to provide customized cushioning and support for the driver. By changing the support around the hips, waist, and lumbar area, this feature helps reduce fatigue and improve comfort during long drives, continuous highway travel, or changing driving conditions.
Kia Telluride (LQ2, 2027-2026) Owner's Manual: Leg support
Upward Downward Operation Push the rear portion of switch (1) forward to raise the leg support. Push the front portion of switch (2) rearward to lower the leg support.